Showing posts with label Authentication. Show all posts

Monday, 24 February 2025

IAM Cloak, without the Dagger

 - or using a Keycloak setup as your Authentication solution in your native Delphi application.


With no reference to melodramatic intrigues, espionage, secret agents or a Marvel crime-fighting team involving experimental drugs, this post will just try to enlighten how fairly easy it is to get started with Keycloak as an authentication backend for your Delphi application.

This post is a continuation of some earlier post about IAM related stuff and my Auth component samples for PingOne, EntraID and now Keycloak on GitHub.

The posts can be found here:

GitHub gist/repos:
The EntraIDAuth was used in my Delphi Summit 2024 session: I can, therefore IAM.

Keycloak

Keycloak is a mature Open Source IAM solution, and I am by not means an expert - but I have been dabbling with some of the other provides - and this is as good as any.

The easiest way to get started is to install a docker container as described in the official documentation here.

There are other options and a lot more to it, but that short guide has you started, and we use that sample as the basis for the KeycloakAuth component, found in the last repo link above. Note that at the time of writing this post, it does only parse an access token for the "uniqueid", and the state parameter is by default added.

The state value is a GUID (or should I say UUID) - so to get "proper" UUID, I end up doing this:

if FUseState then
begin
  FStateValue := TGUID.NewGuid;
  URL := URL + '&state=' + GUIDToString(FStateValue).Trim(['{','}']).ToLower;
end;

Using the state parameter in the authorization code flow, helps to check that the client value sent matches the value in the response - to mitigate CSRF/XSRF (Cross-site request forgery) attacks. After that initial check one should then check the nonce given within the id_token.

But getting ahead of myself - to use and play around with my KeycloakAuth component - get it from GitHub as mentioned above - and install the component in the IDE (Delphi 12 package in repo).

As any of my other Auth components, this is based of TWebBrowser - and I hear you ask why not TEdgeBrowser? Well I had done some things similar years back before Edge was a thing, but since I do strongly suggest that the "SelectedEngine" property is set to "EdgeOnly" - TWebBrowser does internally use a TEdgeBrowser. It does mean you do need to install the Edge WebView2 SDK, and deploy the correct dll. Read all about it here.

Create a new VCL application and drop a KeycloakAuth component, align to client and set the following properties:

    RealmName = 'myrealm'
    AuthPath = 'http://localhost:8080/realms/'
    ClientId = 'myclient'
    RedirectUri = 'http://localhost:1234'
    AuthEndpoint = '/protocol/openid-connect/auth'
    TokenEndpoint = '/protocol/openid-connect/token'
    Scope = 'openid'
    UseState = False
    ResponseType = 'code'
    UserIdClaim = sub
    OnAuthenticated = KeycloakAuthenticated
    OnDenied = KeycloakDenied

Add an OnAuthenticated and OnDenied - like:

procedure TForm6.KeycloakAuthenticated(Sender: TObject);
begin
  ShowMessage('Welcome '+KeycloakAuth1.GreetName+'!'+
    sLineBreak+sLineBreak+'You have been authenticated as userId:'+
    KeycloakAuth1.UserId);
end;

procedure TForm6.KeycloakDenied(Sender: TObject);
begin
  ShowMessage('You have not been authenticated!');
end;

In the forms FormShow event call the components Authorize procedure, to start the flow.

I will add more capabilities to the component - such as nonce and code challenge, and cover all OpenID Connect response_type combinations.

To get a good grasp and overview of the OpenID Connect flows - take a look at this Medium post.

Happy 30th anniversary - Delphi! and see you at Delphi Summit 2025.

/Enjoy

Tuesday, 2 January 2024

Just Ping someone!

- or a component for Ping Identity's authentication within your Delphi application.


It has often been the rule that native applications either authenticate the user by current OS user or by an application-centric user and role model - but that might for multiple reasons not be good enough anymore.

The old AD or LDAP lookups are being replaced by cloud IAM platforms, to control and secure the authentication of the identity of the user.

After the user is authenticated (and is authorised "access" your application), the application-centric roles flow can continue as-is.

One of these IAM cloud provides is PingIdentity, and they have a fairly extensive Postman collection for their PingOne Platform API - found here. Their developer documentation is also very useful - found here.

I have previously used various ways against various providers, but it seemed that when testing against PingOne with MFA enabled (Multi-Factor Authentication - which might include the annoying phone thing - that everyone uses) - I was hit by either a CORS issue or something else.

When using an OAuth2/OpenID Connect authentication, it does require that you setup and use a redirect uri, to tell the provider who is locally listening/waiting for the "response".

The idea with this type of authentication, is that the flow is handled securely within a web browser session, and the client does at no point in time know the login credentials - only when the user is authenticated do we need an "id token". So no "local" storage/handling of "passwords".

The listener part and possible timeouts has always annoyed me, so it seemed based on the flow, that I could handle it differently by just intercepting the local redirect call with the auth code - when the user is authenticated on the PingOne side - to get the id token needed.

Implementation

The TPingOneAuth component is a descendant of standard TWebBrowser overriding the IDocHostUIHandler interface, and adding a some properties.

The GetHostInfo override is to ensure that all redirects in the browser component is triggering the OnBeforeNavigate2 event - which then on the redirect auth code call, will get the wanted id token.

function TPingOneAuth.GetHostInfo(var pInfo: TDocHostUIInfo): HRESULT;
begin
  pInfo.cbSize := SizeOf(pInfo);
  pInfo.dwFlags := 0;
  pInfo.dwFlags := pInfo.dwFlags or DOCHOSTUIFLAG_NO3DBORDER;
  pInfo.dwFlags := pInfo.dwFlags or DOCHOSTUIFLAG_THEME;
  pInfo.dwFlags := pInfo.dwFlags or DOCHOSTUIFLAG_ENABLE_REDIRECT_NOTIFICATION;
  Result := S_OK;
end;

The id token is then parsed using Pablo Rossi's brilliant JOSE and JWT library, that might as well have been done using a call to one of the PingOne's Token Introspection endpoints.

Since we do need an user id - the OpenID Connect scope must include profile also.

To parse the custom claim a custom TJWTClaims class is added, containing the profile claims we want to read.

TPingOneClaims = class(TJWTClaims)
// Adding some given by the OpenID Connect scope: profile
private
  function GetPreferredUsername: string;
  procedure SetPreferredUsername(const Value: string);
  function GetGivenName: string;
  procedure SetGivenName(const Value: string);
  function GetFamilyName: string;
  procedure SetFamilyName(const Value: string);
public
  property PreferredUsername: string read GetPreferredUsername write SetPreferredUsername;
  property GivenName: string read GetGivenName write SetGivenName;
  property FamilyName: string read GetFamilyName write SetFamilyName;
end;


Usage

Install the TPingOneAuth component in the Delphi IDE, and set the library path - business as usual.

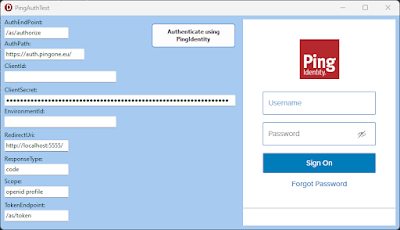
There is a small sample application in the GitHub repo, but steps are at follows:

Drop or Create the TPingOneAuth on a form, setting following properties:

  • AuthEndpoint: /as/authorize
  • AuthPath: https://auth.pingone.eu/
  • ClientId:
  • ClientSecret:
  • EnvironmentId:
  • RedirectUri:
  • ResponseType: code
  • Scope: openid profile
  • TokenEndpoint: /as/token
All these values are found in the PingOne console, under the application you setup as a "authorization" reference to your native Delphi application.


Add code to the OnAuthenticated (and OnDenied) event(s) - were on a successful authentication the public properties UserId and GreetName can be useful.

To start the authentication just call the Authorize method - and with MFA enabled, you will see the prompt bellow, once you initially have given your credentials.


After finding your phone, and having swiped to authenticate in the PingOne mobile companion app, the OnAuthenticated event is called.


The code for the component and the sample is found here.

A thing to note:

When having MFA enabled - and you need to pair a device the first time around - the url Ping provides does contain some "strict mode" Javascript that IE will prompt you about twice, the solution to this is to set the SelectedEngine property to EdgeIfAvailable or EdgeOnly and deploy the EdgeView2 Runtime (WebView2Loader.dll) which can be found in GetIt as the EdgeView2 SDK.

/Enjoy